Seametrics Authorized Distributors are trained and very knowledgeable of all Seametrics products. Please contact a distributor to get detailed case-by-case applications support.
Find Your Local DistributorSelecting the Right Product
Q: How do I select the right equipment for my application?
Q: What is conductivity and why do I need to know this when using a magmeter?
Conductivity refers to the ability of a material to transfer electrical potential. This value is typically measured in microSiemens per centimeter. Seametrics magmeters require a conductivity of at least 20 mS/cm in order to operate properly.
Q: How does an electromagnetic flow meter work?
This video illustrates the difference between mechanical and electromagnetic flow meters.
Q: Why can’t I use my MJ meter with a Seametrics Display unit?
The FT400 Series displays require a frequency of at least 1 Hz in order to operate properly and the MJ and WJ Series meters typically do not provide a pulse frequency that exceeds 1 Hz. Therefore Seametrics does not recommend using the MJ or WJ units with Seametrics display units. MJ and WJ meters are intended for totalizing only and often a simple pulse counter (not provided by Seametrics) is sufficient for this task.
Q: Which meters are compatible with the chemicals in my process?
Check our Seametrics Chemical Compatibility Database to see if the chemicals in your process are compatible with Seametrics meters. If you cannot find your chemical in our database, we recommend checking Cole Parmer’s Database or other external resources.
Q: Why is it important to meet the straight pipe requirements?
Without proper straight pipe before and after the flow meter, the profile of the flow will not be smooth and a proper reading of the flow rate cannot be measured. For specific straight pipe requirement please reference the appropriate instruction manual or technical bulletin.
Q: Is viscosity of my fluid going to cause any issues with a Seametrics meter?
Typically, as long as there is enough pressure in the line to push the fluid through the line, your Seametrics flow meter should function. For mechanical meters, if the fluid’s viscosity is substantially different from the viscosity of water (0.894 cP) you will need to field calibrate your Seametrics meter. For electromagnetic flow meters, the accuracy of the meter will not be affected by the viscosity of the fluid.
Q: What type of output signals do Seametrics meters have?
With the exception of the MJ and WJ units, most Seametrics products have a current sinking pulse output. This is often referred to as an open collector or NPN signal. The FT420 and AO55 units also have analog output capabilities.
Q: How do I determine if other equipment is compatible with a Seametrics unit?
The quickest way to determine this is by doing the “tap test.” If you can make your pump operate or your display count up by tapping the two input terminals together with a jumper wire, then the unit should be compatible with your Seametrics unit.
Q: What is the difference between a digital and analog output?
A digital signal is discreet which means you only get a signal at set intervals while an analog signal is a continuous waveform.
Q: How does an analog signal work?
An analog signal relies on current through a wire to transmit a signal as opposed to a voltage change.
Q: What is the difference between accuracy of reading and accuracy of full scale?
Accuracy of reading means the percentage of variation will remain a constant percentage over the full range of flow. Accuracy of full scale means the percentage of variation is fully dependent on the maximum flow rate of the device and the variation will be a constant flow rate (ie: gpm) as opposed to a percentage. Please see the technical bulletin on Full Scale Accuracy for more details.
Q: What power supply should I select for my Seametrics meter?
It is very important to have the correct power supply for your device, and each Seametrics meter has different power requirements. To find out what particular supply should be used for your meter, see our Power Supply Chart.
Setting Up Your Equipment
Q: How do I determine my K-factor?
If you know the model number of your meter, please use our online K-factor Calculator to determine your k-factor.
Q: Why does insertion depth matter so much when using an insertion meter?
Seametrics insertion meters are designed to be installed at a very specific location based on fluid dynamic principles. In order to function properly, the insertion meter must be placed in the location where the flow profile will stay most consistent during fluctuating flow ranges. To learn more about this concept, please see this video.
Q: Where can I find a wiring diagram for my specific equipment?
Check our Wiring Diagrams by Components page for most wiring diagrams. If your configuration is not found, please reference the instruction manuals for your components or contact your local distributor.
Q: How do I set up my new FT400 Series display unit?
Please reference the FT400 Series Instruction Manual for detailed programming instructions.
Q: How do I set up my analog 4-20mA loop?
Watch this video to learn how to connect your analog loop and use a 4-20mA signal.
Q: How do I mount a Seametrics insertion meter on my pipe?
When using insertion meters it is crucial to use the correct fitting. View our list of tee, saddle and weld braze fittings for fixed depth insertion meters. For adjustable depth insertion meters, you will be required to use a saddle fitting. Please see the Installation Bulletin for an explanation of how to mount your saddle fitting.
Q: Do I need to ground my Seametrics unit and how should this be done?
Grounding is very important for most Seametrics meters. Please check the instruction manual for your specific device and read through our Grounding Technical Bulletin for further details.
Troubleshooting Your Equipment
Q: Who should I contact for help with troubleshooting my equipment?
If the answer to your questions cannot be found on our Website, please contact your local distributor for further assistance. Your distributor will be able to provide direct support for your application.
Q: How do I find and identify the model and serial number of a Seametrics meter?
The model number and serial number can both be found on a white label on your product. The model number will be a combination of letters and numbers as identified in our catalog, and the serial number is an eight-digit number.
Q: My meter is battery powered. How long should I expect the battery to last?
The battery life is completely dependent on the application and use of the meter. Please refer to the instruction manual of your specific device for an estimate of the battery life to be expected.
Q: What is “phantom flow” and how can it be eliminated?
“Phantom flow” refers to a situation where flow shows up on the electronics display even when there is no flow going through the line. This sometimes occurs with electromagnetic flow meters when there is electrical noise interference coming from another device. This issue can usually be resolved with grounding modifications.
Q: How can I determine whether it is the sensor or the controller that is not working properly?
For mechanical meters, a voltmeter can typically be used to check for pulse output. See this video for how this should be done. For the insertion magmeter, the pulse output is too fast to be seen with a voltmeter, this is why there is an LED indicator light which indicates whether the meter is sensing flow. The “Tap Test” can be used to determine whether the controller is working properly.
Q: Where can I find more troubleshooting help for my specific product?
For detailed troubleshooting tips on certain products, please reference the last page of the instruction manual for the specified products.
Warranty & Non-Warranty Repairs
Q: Where can I get replacement parts for my meter?
Please contact your local Seametrics distributor for any replacement parts.
Q: How do I return Seametrics products for evaluation?
Please contact your local Seametrics distributor and have them submit an RMA request for any products which you would like Seametrics to evaluate.
Q: Can Seametrics calibrate my meter?
Seametrics can calibrate certain meters in house. Other meters will receive a Certificate of Conformance. Please contact your local Seametrics distributor for further details.
Q: Why don’t magmeters require periodic calibration?
Since magmeters do not have mechanical parts that wear out, once the unit has been calibrated (during the manufacturing period), it should not drift from this original setting, and therefore does not require period calibration.
Q: If I want to return an unused product is there a restock fee?
There is usually a restocking fee associated with unused product returns. Please contact your local Seametrics distributor for further details.
Q: What does the Seametrics Warranty Policy cover?
Seametrics has a 2 year warranty on all products. This limited warranty does not cover customer damage. For full details on warranty coverage, please see our Limited Warranty Policy.
Q: Who pays for shipping when I need to send in a product for warranty evaluation?
Standard Seametrics RMA process requires that the customer pay for shipping on returned items. If the unit is shipped back to the customer after warranty repair, the outgoing shipping costs will be covered by Seametrics.
Q: How can I check the status of my RMA?
Please contact your local Seametrics distributor for status updates on any RMA’s.
General Sensor Questions
Q: What are PSIA (absolute), PSIG (gauge), and PSIS (sealed gauge) pressure sensors and how do they differ?
PSIA (absolute) sensors measure the depth plus the atmospheric pressure. This atmospheric pressure must be subtracted from the absolute pressure to give the actual pressure due to depth. For information on using the Barometric Compensation utility to perform these calculations, refer to the Barometric Compensation Utility application note. In addition, the AquiStar Compensator obtains readings from several down-hole sensors, automatically applying barometric compensation.
Our PSIG (gauge) sensors utilize a vent tube in the cable to allow the device to reference atmospheric pressure. The resulting gauge pressure measurement reflects only the depth of submergence.
We also offers a PSIS (sealed gauge) pressure sensor. This is an absolute sensor to which 14.7 PSI offset has been included to account for air pressure. Thus the measurements reflect only the pressure due to depth, when assuming a standard barometric pressure of 14.7 PSI. Measurements with this sensor will vary slightly due to barometric and weather changes.
Q: What is the desiccant tube and what do I do with it?
The desiccant tube prevents moisture in the air from being sucked into the vent tube, which can cause erratic readings and sensor damage. Install the sensor so that the desiccant tube will not flood or lie in water.
The desiccant is a bright blue color when active and dry. As moisture is absorbed the color will begin to fade becoming light pink, indicating full saturation and time to replace. The life of the desiccant varies depending on the environment in which it is installed. The damper the environment or the higher the humidity, the more often the desiccant will need to be replaced. Inspect the desiccant every few weeks, until you know how it responds in your particular environment. Replacement desiccant tubes and desiccant refill bottles can be purchased from your INW or Seametrics sales representative.
Q: I’m getting erratic readings from my sensor.
Erratic readings can be caused by a poor connection, damaged cable, moisture in the unit, or a damaged sensor. In most cases, erratic readings are due to moisture getting into the system. First check the connection. Look for moisture between contacts or a loose or broken wire. Next, check the cable for cracking or fraying. If the connections and cable appear okay, but the readings are still erratic, the sensor may be damaged. Contact INW/Seametrics for evaluation and repair.
Erratic and erroneous readings can also occur due to improper grounding. See the Grounding Issues application note.
Q: Pressure readings are oscillating over time.
If, after time, your sensor is functioning normally but your data is showing a cyclic effect in the absence of water level changes, you are probably seeing barometric changes. The amount is usually 0.5 to 1.5 feet of water. This can be caused by actual water level changes in the aquifer in response to barometric pressure changes. This effect can occur in tight formations where the sensor will immediately pick up barometric changes but the aquifer will not. If you think you are having this type of problem you will have to record the barometric pressure, as well as the water level pressure and compensate the data.
This can also be caused by a plugged vent tube in the cable. If a desiccant tube is not installed or if the desiccant is fully saturated, water may have condensed in your vent tube causing it to plug. If it appears that the vent tube is plugged, consult your INW/Seametrics service technician.
Q: My pressure readings are zero.
Continuous zero readings are usually caused by an open circuit, which may indicate a broken cable, a bad connection, or possibly a damaged sensor. Check the connector to see if a wire has become loose or if the cable has been cut. If damage is not readily apparent, contact INW/Seametrics support for evaluation and repair.
Smart Sensor Questions
Q: What is the difference between Aqua4Plus and Aqua4Plus Lite?
Aqua4Plus is a comprehensive control program for all current Seametrics Smart Sensors. Use it to view sensor status, monitor real time data, set control features on the sensors, as well as retrieve and view collected data.
For those users with only PT2X, PT2X-BV, CT2X, and TempHion sensors, Aqua4Plus Lite offers a simpler interface with all the major functionality of the standard Aqua4Plus, making it an ideal choice for most users.
Q: Will Aqua4Plus work on Windows 8?
Yes, Aqua4Plus and Aqua4Plus Lite both run on Windows XP (SP3), Windows 7, Windows 8, and Windows 8.1.
Q: How can I get the most current software for my Smart Sensor?
The most current releases of Aqua4Plus and Aqua4Plus Lite can be downloaded from our Software Download page.
Q: Can I read my Smart Sensor without the Aqua4Plus or Aqua4Plus Lite software?
Yes. Smart Sensors can be read by most Modbus® equipment, directly returning measurement readings, without any further math on the part of the host system. See the Modbus Direct Read application note for details.
Q: Can I read my Smart Sensor with a Campbell logger?
Yes, Refer to the Reading Smart Sensors with Campbell Loggers application note.
Q: I can’t communicate with my Smart Sensor.
Connect your sensor to a USB port on the computer as shown in the diagram below.
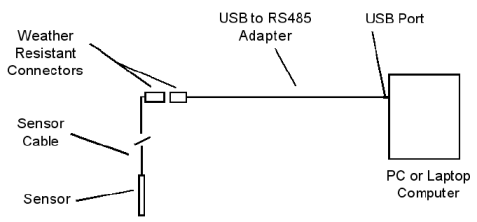
(If you are using Aqua4Plus and want to use an RS232/serial port, see connection options under Alternate Connection Options in the Aqua4Plus Instruction Manual.)
Make sure all cable connections are secure.
Be sure to use Aqua4Plus version 1.9.2 or higher or Aqua4Plus Lite. The newest versions are available on our Software Download page.
If using Aqua4Plus, select USB in the drop-down box on the main window in Aqua4Plus. (Aqua4Plus Lite automatically uses the USB connection.)
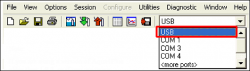
Be sure you have installed the USB driver.
- Most Windows 7 and Windows 8 computers will automatically go to the Internet and download the proper drivers.
- If you have Windows XP, do not have Internet connectivity, or do not want to access the drivers via the Internet, you can install the drivers directly from Aqua4Plus. From the Utilities menu, Advanced options, select “Install USB/RS485 Drivers.” Select your operating system, and then click Install. After installation do the following: (1) If the cable was plugged in during installation, unplug it and plug it back in. (2) Close and reopen Aqua4Plus.
- Alternately, you can download the drivers from our Software Download page. A copy is also provided on the USB stick or CD that came with your communication packet.
- See the application note USB/RS485 Communication Cable Installation Instructions for more detailed information.
Q: I have followed the above instructions, but I still do not see USB in the drop-down box on the main window in Aqua4Plus, or Aqua4Plus Lite is saying that no USB ports can be found.
- Click the Start Button on your computer.
- Right-click on “Computer.”
- Click on “Manage.”
- In the left pane, click on “Device Manager.”
- You may need to update the first driver: In the right panel, under “Other Devices,” you may see a yellow exclamation point next to USB Comm. Right-click on this and then select Update Driver Software. This will update the first set of drivers. You should get a message saying that the USB Serial Converter has been installed. Close this window.
- Now you may need to update the second driver: In the right panel, under “Other Devices,” you may see a yellow exclamation point next to USB Serial Port. Right-click on this and then select Update Driver Software. This will update the second set of drivers. You should get a message saying that the USB Serial Port has been installed. Close this window.
- Restart Aqua4Plus or Aqua4Plus Lite.
- See the application note USB/RS485 Communication Cable Installation Instructions for more detailed information.
Q: My PT2X or CT2X measures pressure in PSI. How can I change this to feet of water or other units?
In Aqua4Plus, click on the Options menu and then select Display Units. In Aqua4Plus Lite, click on the Configure menu, select Program Configuration, and then select Set Computer Display Units. Use this to select the units in which to display your data. This will control how data is represented on the Real Time Monitor, the File Display Window, the Graph Window, and for exported data.
Q: I want to use my PT2X or CT2X to measure depth-to-water, water elevation, or a staff gauge equivalent. How do I do this?
Select Settings and Calibration from the Configure menu in Aqua4Plus or click the Settings button in Aqua4Plus Lite. Click on the Pressure channel, if it isn’t already highlighted. From the drop-down box just below the channel list, select the type of measurement you want – submergence, depth-to-water, elevation, or staff gauge. A diagram will be displayed illustrating the type of measurement. Follow the step-by-step instructions on the Settings and Calibration page to complete the setup. If using an absolute sensor, you will need to know the current barometric pressure. For depth-to-water and elevation, you will need an alternate water level indicator to find the current depth-to-water. For elevation, you will also need to know the elevation of the top of the well and for staff gauge equivalent, you will need to know the current staff gauge measurement. Enter these values in the specified entry boxes. Not math is required.
For further details, refer to the technical bulletin “Configuring INW Smart Sensors for Depth-to-Water, Elevation, or Staff Gauge.”
NOTE: For Depth-to-Water on CABLELESS PT2X or LevelSCOUT, see the technical bulletin “Barometric Compensation with Optional Depth-to-Water Setting.” (For Aqua4Plus versions prior to 1.9.10 or Aqua4Plus Lite versions prior to 2.1.4, see the technical bulletin “Compensating INW Absolute Sensor Readings on Cableless Sensors.”
Q: How do I change the batteries in my AquiStar Smart Sensor?
Most battery operated AquiStar Smart Sensors use two standard AA batteries. To change batteries, the housing for the sensor must be opened. Because there is sensitive electronic circuitry inside the housing, battery changing must be done in a clean, dry environment to avoid contamination or moisture damage to the circuitry.
For details on changing batteries in these sensors, refer to the Changing Batteries in AquiStar Smart Sensors application note.
Q: Can I run my AquiStar Smart Sensor on auxiliary power?
Most AquiStar Smart Sensors come with two AA internal batteries. If auxiliary power is desired, you can use a 6 – 15 VDC supply that can provide 15 mA. Connect to Vaux++ (pin 1 – white) and Ground (pin 5 – blue) or contact us for auxiliary power supplies.
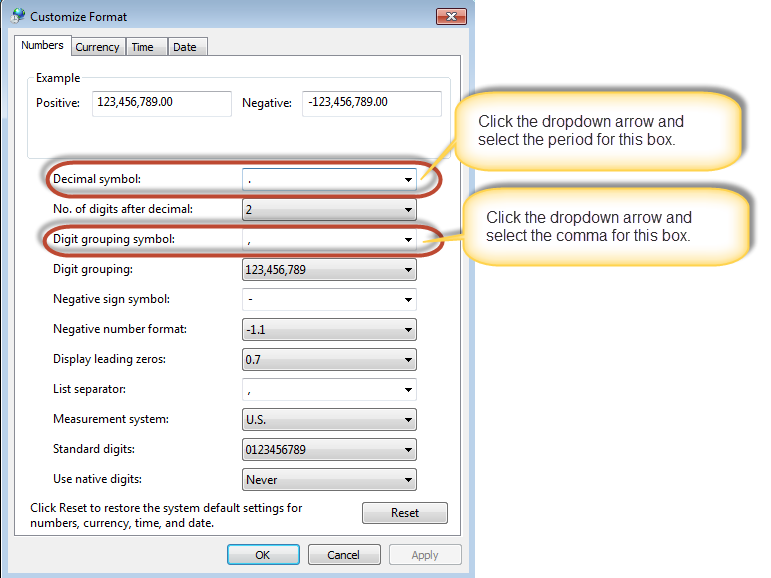
Q: Why do the values in the calibration boxes change the digits after the decimal point into zeros?
Window’s regional settings control whether a comma or a period is used as a decimal symbol. In the United States, a period is used, for example, 12.458. In some countries, a comma is used, for example, 12,458. If your computer is set to use the comma, then the calibration fields in Aqua4Plus will truncate anything after the comma. To work around this, you will need to change the Decimal symbol and Digit grouping symbol setting in Windows. You should only have to do this during calibration and can change back to your normal settings after calibration is complete.
To change these settings:
- Access the Regional and Language settings from Control Panel.
- On Windows 7, click the Additional Settings button; on XP, click the Customize button.
- Click the Numbers tab.
- Change the settings and click Apply